
With the rising advancement of tech around us, we all have not only benefited but also entangled ourselves in loops. These loops at times prove as a security threat to us, as no longer our lives remain. We might think that our lives are private and secure, but we are constantly being watched by several sources and eyes. For instance let’s take the example of Truecaller, which we used to track the details of unknown phone numbers. The tech that we were supposed to use to safeguard ourselves, as per research turns out to be one of the biggest data breaches. So, today in this blog we are going to tell a way out from this, by using Truecaller Unlist. Therefore, keep reading this article till the very end as we enlight you with this useful insight.
Know About Truecaller Unlist
We all have must heard about the Turecaller, which got all into sensation with its launch in the year 2009. This application says the platform was launched for mobile users to get track and details of any unknown caller on their devices. But in recent years, there has been a lot of news about the biggest data breach from the platform, which has made users of the platform feel anxious. So, in case you want to take a toll on your identity and the amount of data you want to share, then you can use the Truecaller Unlist feature. With the help of this feature, you will be able to remove or even edit your name on the Truecaller platform without even removing your mobile number from the platform.
Reason To Truecaller Unlist Feature
There are multiple reasons for you to use Truecaller Unlist features, and we have mentioned some of the acclaimed ones here. Reading through them will provide you with a better overview of the need to use this feature.
- Control on Mobile Identity: When you use this feature and unlist your number on the platform, you get control over your mobile identity. Apart from this you also control the amount of personal information that you wish to share with the application users.
- Calling Details: Though you use Truecaller Unlist features, you would still be able to receive details of the other person calling. That means your experience of using this platform won’t be hindered if you share limited information about yourself.
- Protection: When you unlist your number you also indirectly protect yourself from any kind of unwanted conversation. This will not only keep you aloof from other unknown persons but also safeguard your identity.
- Trust: Through this feature, you will be able to build to build trust among your contacts. Despite the fact that your identity is no longer listed, the true caller users will get to know about your calling with the help of your number.
- Caller ID: When you use Truecaller Unlist features, your name won’t be displayed on the screen, instead your caller ID will be visible. This would keep data protected as well as your contacts aware of your presence.
How To Use Truecaller Unlist On The Website?

If you wish to use the Truecaller Unlist via, the official website, then go through the mentioned details carefully, and utilize the same.
- Tap open any of your desired “Browser” on any of your preferred devices.
- Once the browser is opened use the address bar and enter “Truecaller Unlist” on it.
- From the appearing result, you need to tap on the topmost result and you will be directed to the Unlisting portal.
- On the directed portal enter your mobile number along with your country code, and complete the captcha code.
- Finally, click on the “Unlist” button to complete the Truecaller Unlist process via the website.
Steps To Use Truecaller Unlist For Android
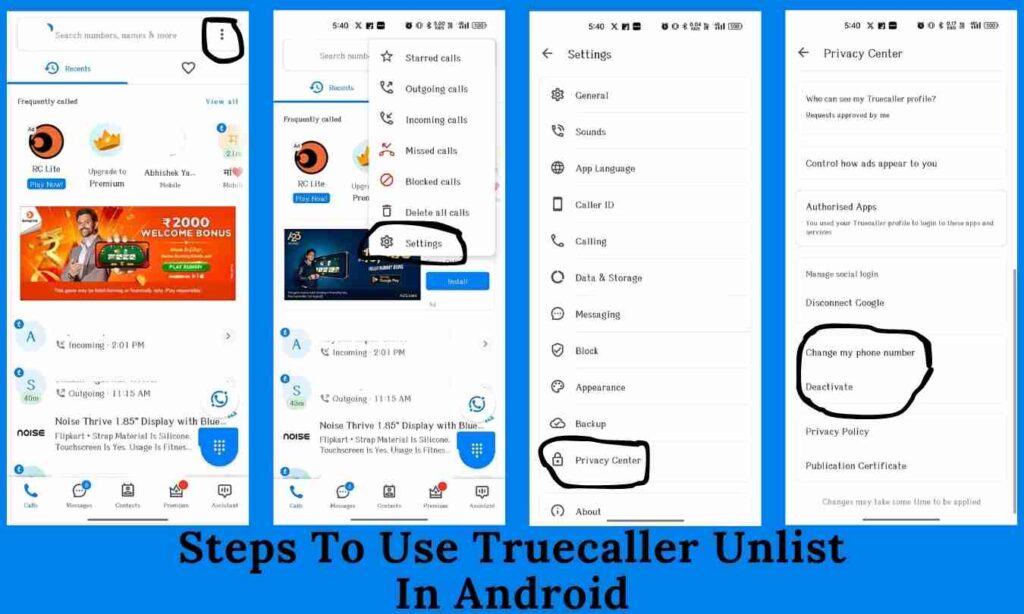
If you are an Android user and wish to use the Truecaller Unlist feature on your devices, follow these listed steps. By following these simple steps you will get your hand on the multiple offerings easily.
- The foremost step is to open your “Truecaaller” app on any Android device of your choice.
- Upon opening the application, you need to tap on the “Menu Bar” present on the left corner of the main dashboard.
- Scroll down on the “Menu Bar” and select the Setting option.
- From the appearing drop-down menu, you need to tap on the “Privacy Center”
- On the presented new page, tap on the deactivate option, and you will be prompted with yes and no options.
- Select yes in the prompt and re-tap on the “Yes” option and your Truecaller Unlist has been successfully processed.
Process To Use Truecaller Unlist For iOS
Do not worry if you are an iOS user, as we have got you covered, by listing down the steps that you need to follow.
- Undeniably the first thing that you need to do is tap open your “Truecaller Unlist” App.
- From the bottom right corner of the opened dashboard, you need to tap on the “More” button.
- Moving ahead you need to click on the setting option, where you will be asked to select “Privacy Centre”.
- Upon selecting the “Deactivate” button you will be prompted to select form to options. Whether to keep my data or Delete my data.
- Choose to delete my data to erase everything, and again hit “Deactivate Account”.
Disclaimer: “We have uploaded information on this topic to spread awareness among our readers. It is always suggested to go through official domain to avail its services. Although is any user is using their information and services then, do mentioned as their official reference.“
Conclusion
Truecaller Unlist feature is going to be one the excellent ways through which you can give only selected user data. With the effective use of this feature, you have the potential to control your mobile identity and share only the required information. Thus, to make you aware of this so that you can extract the maximum benefit from features, we have mentioned detailed information. Through this blog, you will get to know about ways you can use this feature on different devices, along with the reasons to use this feature.
Also, read this:
11zon: Complete Easy Process To PDF, JPG, And Image Compressor Free